Add food to menu 1. Purpose To add new items to the menu including: Common food Food by ingredient Food by category 2. Fields 2.1. Enter common food Instruction steps 1. Select Menu, click Add. 2. Select Type: Food. Click Food and enter item information on General information tab. Note: The restaurant can use item ID as suggested by the software in System settings\General settings or use its own ID. If the restaurant divides the menu by the order of serving, select Item Order as Appetizer, Main course or Dessert. If it is the special item, check Special item. At that time, the item will be displayed on Special on Order screen of the waitstaff. Description of the item will be displayed on Order screen so that the waitstaff can consult guests. If checking Not display on menu, the item will not be displayed on the screen of the waitstaff/cashier For the food photo to look good, size should be 4x3. E.g.: 1280x720 pixel. 3. On Tax / Price after tax tab Select tax rate and price after tax for each type of service. The program will automatically calculate price before tax of the item. Note: Check Price schedule if the item is subject to market price, for example seafood. If price after tax is the same for all types of service, check Price after tax is the same for all types of service and enter selling price. 4. On Modifier tab: Note modifiers which guests usually request (if any). Note: When the cashier enters other request on Order screen, this request will be automatically updated on Modifier tab. 5. On Ingredient recipe tab: Set Ingredient recipe for processing each item. This is the basis for calculating stock issue. 6. Click Save. 2.2. Enter food by ingredient Usually apply to items with the unit as kg, piece such as seafood, chicken, duck... Instruction steps 1. Select Menu, click Add. 2. Select type: Food. Check Food by ingredient and enter information on the item on General information tab. Note: Items which are processed from ingredients can be selected from a list or directly imported. If selecting from a list: That item will display both on Menu and on Food by ingredient. If importing directly: That item will only display on Item by ingredient. If the restaurant divides menu by order of serving, select Item order as Appetizer, Main course, or Dessert. If checking Not display on menu, item by ingredient will not be displayed on the screen of the waitstaff/cashier. 3. Tax / Price after tax tab: Follow the same steps as in Enter common food.2.3. Enter food by category Usually apply to the items which are processed with multiple ingredients like salad, pizza Instruction steps 1. Select Menu, click Add. 2. Select type: Food. Check Food by category and enter information. Note: If the restaurant divides menu by order of serving, select Order of item as Appetizer, Main course, or Dessert. The child items which are listed in a category will be defaulted not to individually display on menu. If you want to display both individually and in Food by category, check Display on menu for such item. If checking Not display on menu, the item by category will not be displayed on the screen of the waitstaff/cashier. Furthermore, it is possible to add food on PC/POS. View details here.
1. Purpose
Instruction steps
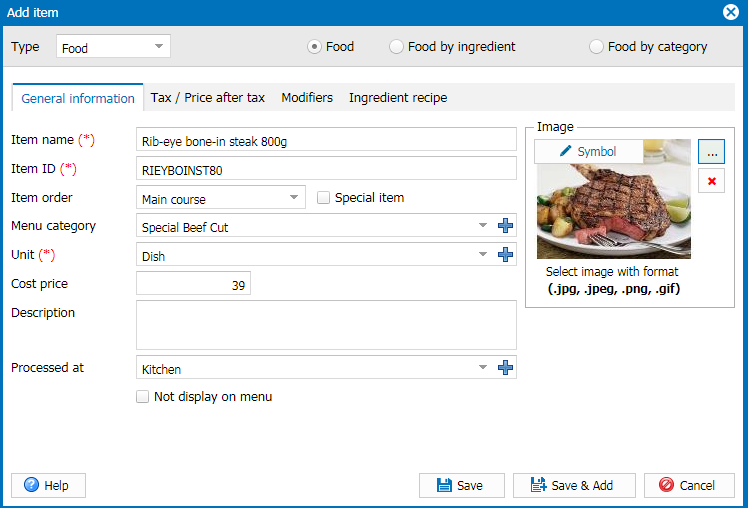
1. Select Menu, click Add. 2. Select Type: Food. Click Food and enter item information on General information tab.
Note:
The restaurant can use item ID as suggested by the software in System settings\General settings or use its own ID. If the restaurant divides the menu by the order of serving, select Item Order as Appetizer, Main course or Dessert. If it is the special item, check Special item. At that time, the item will be displayed on Special on Order screen of the waitstaff. Description of the item will be displayed on Order screen so that the waitstaff can consult guests. If checking Not display on menu, the item will not be displayed on the screen of the waitstaff/cashier For the food photo to look good, size should be 4x3. E.g.: 1280x720 pixel. 3. On Tax / Price after tax tab Select tax rate and price after tax for each type of service. The program will automatically calculate price before tax of the item. Note: Check Price schedule if the item is subject to market price, for example seafood. If price after tax is the same for all types of service, check Price after tax is the same for all types of service and enter selling price.
The restaurant can use item ID as suggested by the software in System settings\General settings or use its own ID.
If it is the special item, check Special item. At that time, the item will be displayed on Special on Order screen of the waitstaff.
Description of the item will be displayed on Order screen so that the waitstaff can consult guests.
If checking Not display on menu, the item will not be displayed on the screen of the waitstaff/cashier
For the food photo to look good, size should be 4x3. E.g.: 1280x720 pixel.
3. On Tax / Price after tax tab Select tax rate and price after tax for each type of service. The program will automatically calculate price before tax of the item.
Note: Check Price schedule if the item is subject to market price, for example seafood. If price after tax is the same for all types of service, check Price after tax is the same for all types of service and enter selling price.
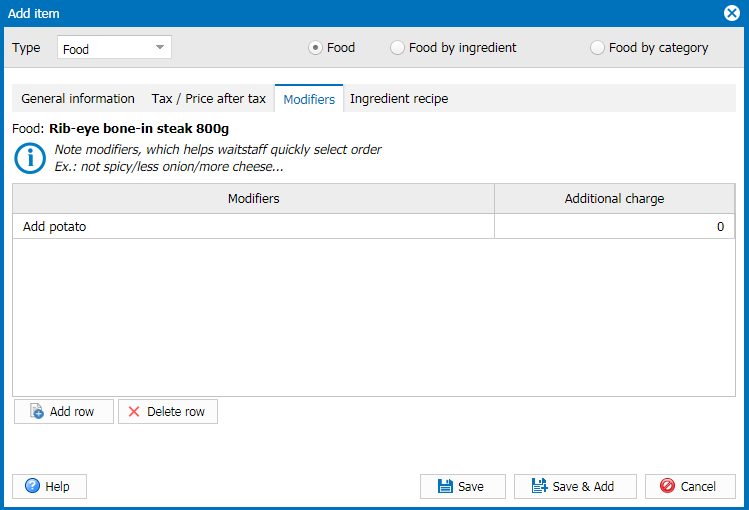
4. On Modifier tab: Note modifiers which guests usually request (if any).
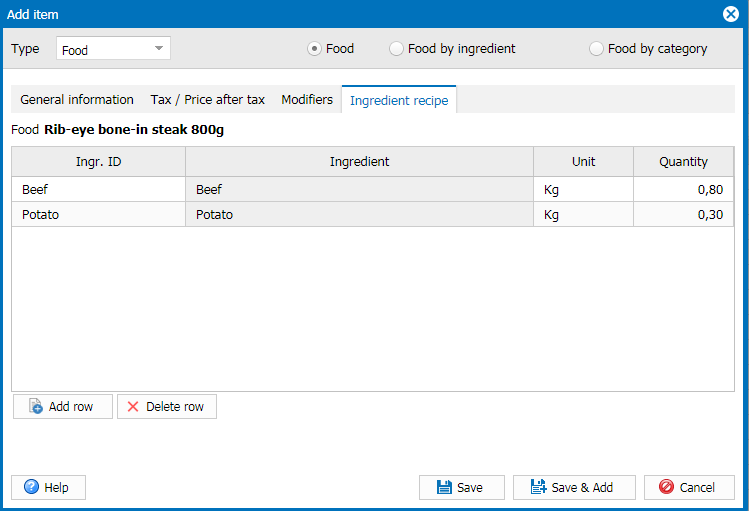
Note: When the cashier enters other request on Order screen, this request will be automatically updated on Modifier tab. 5. On Ingredient recipe tab:
Set Ingredient recipe for processing each item. This is the basis for calculating stock issue.
6. Click Save.
Usually apply to items with the unit as kg, piece such as seafood, chicken, duck...
1. Select Menu, click Add. 2. Select type: Food. Check Food by ingredient and enter information on the item on General information tab.
Note: Items which are processed from ingredients can be selected from a list or directly imported. If selecting from a list: That item will display both on Menu and on Food by ingredient. If importing directly: That item will only display on Item by ingredient. If the restaurant divides menu by order of serving, select Item order as Appetizer, Main course, or Dessert. If checking Not display on menu, item by ingredient will not be displayed on the screen of the waitstaff/cashier.
3. Tax / Price after tax tab: Follow the same steps as in Enter common food.
Usually apply to the items which are processed with multiple ingredients like salad, pizza Instruction steps
1. Select Menu, click Add. 2. Select type: Food. Check Food by category and enter information.
Furthermore, it is possible to add food on PC/POS. View details here.